Create a Track Changes Document by Comparing Two Microsoft Word Files
While collaborating with others or making many revisions to a paper, one of the most convenient features in Microsoft Word is the ability to track changes. The Track Changes feature allows you to keep track of your additions, deletions, and notes while editing a paper. However, if you or someone else didn't track changes during the last editing session, you can create your own tracked changes document, sometimes called a redline document, using Word's Compare feature.
Create a track changes document
To create a tracked changes document, you need to compare two files: the original (before editing) and the revised (after editing). Using these two files, Microsoft creates a third document that is identical to the revised file except it has the track changes markups in it.
Suppose you have two files, one named mypaper1.docx (the original file before editing) and mypaper2.docx (the revised file after editing). You want to create a track changes document that shows the editing changes that took place between the two documents.
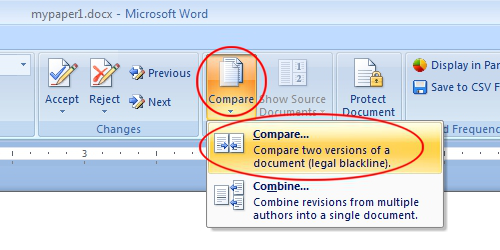
Open up Microsoft Word and click on the Review tab on the Ribbon. Locate a section of the Ribbon labeled Compare and click on the Compare button. In the drop-down menu, click on Compare.
You should now be looking at the Compare Documents window. Locate the section labeled Original Document and use the Browse for Original button (picture of a folder) to select the original document (mypaper1.docx in this example). Locate the section labeled Revised Document and use the Browse for Revised button (picture of a folder) to select the revised document (mypaper2.docx in this example).
Click the OK button and Microsoft Word will immediately open a new file that shows the tracked changes between the original and revised documents. Once you save the document with a new name, you will have an edited document just as if the Track Changes feature of Microsoft Word was turned on during editing of the revised document.


